Hello road warriors and range rovers! Have you recently swapped your gas-guzzler for an electric vehicle (EV)? Congrats! You’ve just fast-forwarded yourself into a future that’s kinder to Mother Earth and your wallet. But now, you’re probably wondering how to keep your new shiny metal beast charged and ready to roll. To help you out, we’ve put together this electrifying guide on EV charger installation at home.
Distinguish the Chargers: Level 1 vs. Level 2
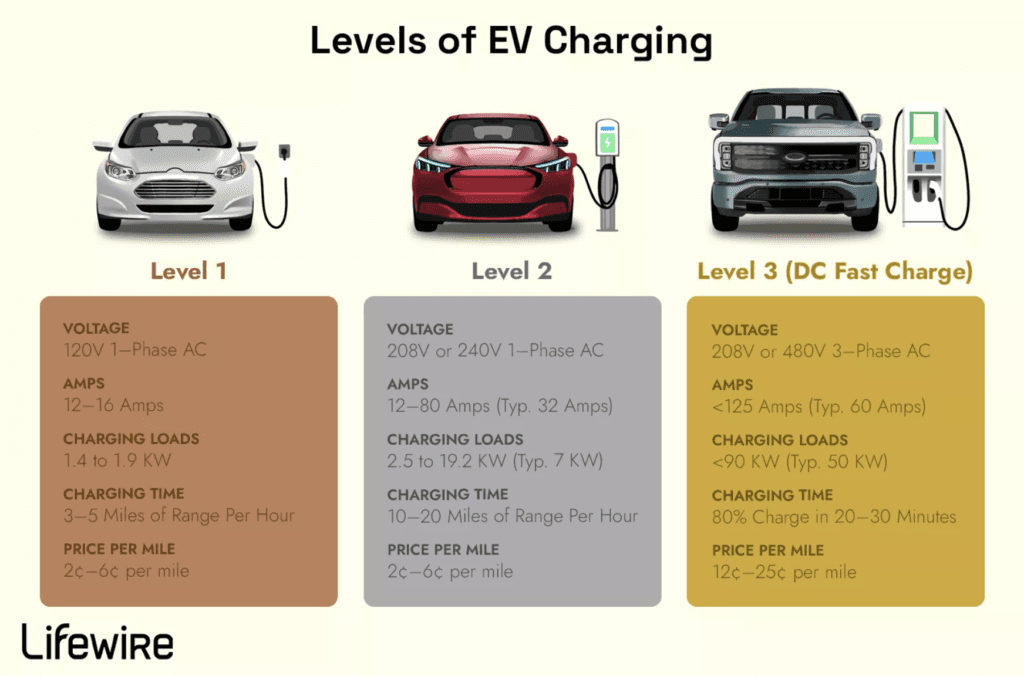
Before we dive into the nitty-gritty of installation, let’s talk chargers. If you’re picturing a gigantic cell phone charger, we don’t blame you, but unfortunately, it’s not that simple. There are two primary types of EV chargers: Level 1 and Level 2. There are also Level 3 EV chargers, however, these are not typically found in homes, but rather in locations like shopping centers and public charging stations.

Image by Lifewire via Joshua Seong
Level 1 Chargers: These EV chargers are equivalent to a tortoise. They’re slow but steady, using a standard 120-volt AC outlet (the kind you plug your laptop into). With this, you can expect about 3-5 miles of range per charging hour. Perfect for those whose idea of a long journey is a trip to the local grocery store.
Level 2 Chargers: These are the hares of the charging world. They require a 208-volt or 240-volt AC outlet (think your clothes dryer plug) and can deliver around 10-20 miles of range per hour—ideal for EV drivers with a serious case of wanderlust.
The Installation Process: Steps to Install an EV Charger

Installing an EV charger at home is like doing the tango— it requires the right steps, a good partner (in this case, a certified electrician), and a dash of patience. Here are the steps:
Step 1 – Choose Your Charger: Decide between Level 1 and Level 2 based on your driving habits and budget. Consider the charging speed and the convenience of each.
Step 2 – Find an Electrician: Unless you’re a close relative of Nikola Tesla or Benjamin Franklin, you’ll need an electrician to handle the installation. Look for one experienced in EV charger installation.
Step 3: Install a Dedicated Circuit: The electrician will need to install a dedicated circuit for your EV charger. This step might involve adding a new breaker to your electrical panel. (Make sure to check out our post on electric panels for more information!)
Step 4 – Installation: Let your electrician take the lead here. They’ll install the 240-volt outlet if you’re going for a Level 2 charger, mount the charging equipment, and make sure everything is up to code.
Step 5 – Inspection: This step is crucial. Ensure the EV charger installation is inspected for safety and compliance with local regulations.
Step 6 – Test Drive: Plug your EV in, let it charge, and give yourself a pat on the back. You’ve just installed an EV charger at home!
Cost Considerations: How much is an EV Charger Installation?

Installing a home EV charger isn’t exactly cheap, but neither is buying a latte every day for a year. You’re looking at anywhere from $500 to $2,000 for a Level 2 charger, including installation. The price can vary based on your electrical system’s readiness, the charger model, and labor costs in your area. But don’t fret! There are federal tax credits available to ease the burden.
Conclusion: Ready, Set, Charge!
Switching to an EV is a big step towards a cleaner environment. And with your home charger, you’re not just making a green choice, you’re also adding a ton of convenience to your life. So, here’s to smooth drives, zero emissions, and never having to visit a gas station again (except for the occasional road trip snacks, of course).
An EV charger installation may seem like a daunting task, but with the right information and a bit of planning, it can be as easy as plugging in your smartphone at the end of the day. Happy charging, folks!
The post EV Charger Installation: What you need to know appeared first on Local Electrician | Electrical Contractor | Concord, CA | O.H.M.S Electric.

